lash map
Perfect lash extensions are never random—they’re carefully planned with lash mapping. In this guide, you’ll learn everything from the basics to advanced techniques, including eye shapes, tools, step-by-step methods, popular styles, mistakes to avoid, trends, and helpful tips. By the end, you’ll know how to create simple, balanced, and fully customized lash maps for every client with confidence.
What Is a Lash Map?
A lash map is a simple guide used by lash artists to plan where each eyelash extension will be placed.
It includes details like length, curl, and style to match the client’s eye shape.
By considering features such as curl type and eye structure, it helps create a balanced and natural look.
This method allows each set to be customized so it enhances the client’s beauty. In short, a lash map makes lash application more precise and tailored for better results.
Why Lash Mapping Matters in Eyelash Extensions
Lash mapping is important in eyelash extensions because it creates a customized design that suits each client’s unique eye shape and features. Without it, the final look can feel uneven or less flattering.
A proper lash map helps artists place different lengths and styles in a balanced way, making the eyes look more lifted, natural, and well-defined. It also protects the natural lashes by evenly distributing weight, reducing the risk of damage.
Most importantly, it allows clients’ preferences to be fully included, building trust and ensuring they leave happy with safe, beautiful, and long-lasting results.
The Importance of Lash Mapping for Lash Artists
Lash mapping is an important tool for lash artists because it ensures precise, customized eyelash extensions for each client.
It helps artists plan the design in advance, making the application smoother, reducing mistakes, and improving overall efficiency.
By understanding different eye shapes, lash artists can create balance and enhance natural features for a more flattering result.
This personalized approach also increases client satisfaction and builds trust, encouraging repeat business.
Using lash mapping shows professionalism and a strong commitment to quality work, helping artists stand out and turn simple extensions into beautiful, long-lasting results.
How Lash Mapping Works During a Client Visit
During a client visit, lash mapping becomes a shared process between the artist and the client.
The artist first discusses the client’s preferences and the look they want, which helps in creating a personalized design.
Then, they assess the client’s natural lashes and eye shape to understand what styles will suit them best and sketch an initial lash map.
After that, different style options are shown, often with visual references, so the client can easily choose what they like.
Once a style is finalized together, precise measurements are taken using tools like calipers or rulers to ensure accuracy.
Key points are then marked to maintain balance and symmetry, allowing the chosen design to be applied smoothly and perfectly during the session.
Understanding Eye Shapes for Perfect Lash Mapping
Understanding eye shapes is very important for creating the perfect lash map because every eye type needs a different approach.
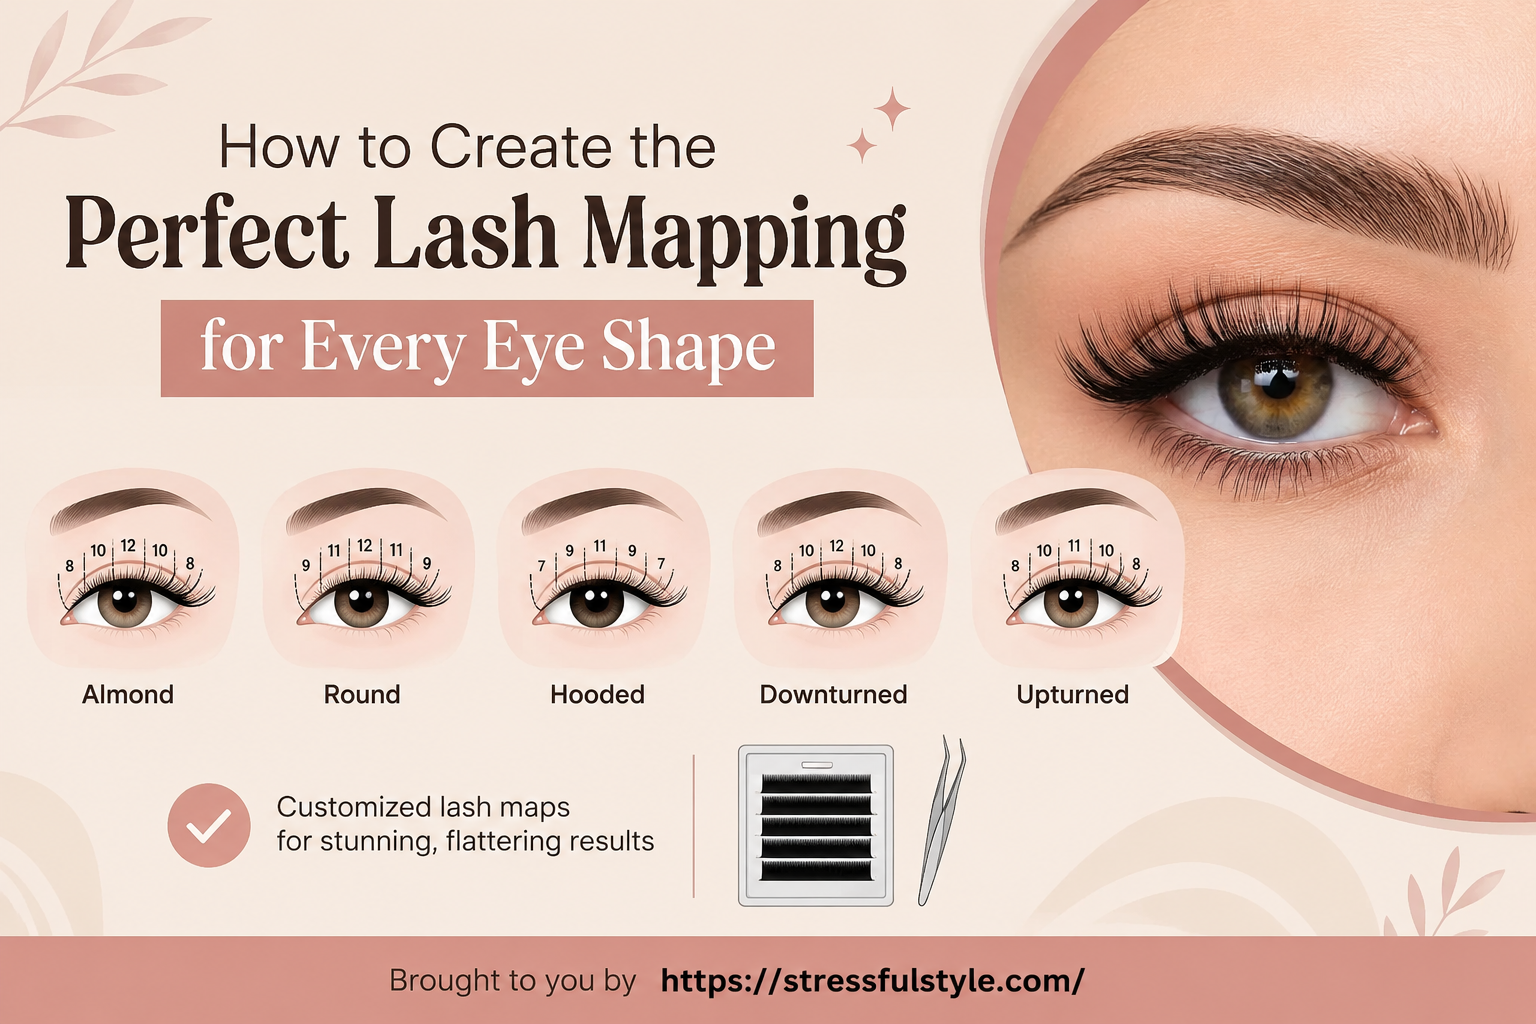
Almond-shaped eyes are quite versatile and can suit many styles, from natural to bold, as long as the right lengths and curls are chosen to enhance their natural beauty.
Round eyes usually benefit from longer lashes on the outer corners to create a more elongated, balanced look without losing their natural softness.
Hooded eyes need a lifting effect, so shorter lashes work better at the inner corners while gradually getting longer toward the center to open up the eyes.
For deep-set eyes, placing longer extensions in the middle helps bring balance and highlight their depth.
Recognizing these differences allows lash artists to design a lash map that truly fits each client, ensuring beautiful, customized results every time.
How to Choose the Right Lash Map for Your Eye Shape
Choosing the right lash map depends on the eye shape—almond, round, hooded, or monolid—since each needs a different style.
Almond eyes suit gradual lengths, round eyes look best with longer outer corners, hooded eyes need a lifting effect, and monolids work well with shorter inner corners and longer outer edges.
Face shape and eyelid height also matter. When customized properly, lash mapping enhances natural beauty and creates a balanced, flattering look.
Tools Required for Effective Lash Mapping
Effective lash mapping requires a few key tools for accuracy and precision.
A ruler or measuring tape helps set proper lash lengths, while a marking pen or pencil creates clear guidelines on the eyelid.
Tweezers are used for precise placement, and a digital scale helps balance lash weight. Adhesive dots or pads keep everything organized during application.
With these tools, lash artists can easily create clean, customized lash maps for each client.
Checklist Before You Start Lash Mapping (Eye Shape, Angle, Spacing, Face Shape, Lash Strength)
Before starting lash mapping, it’s important to check a few key things for the best results.
First, look at the client’s eye shape and angle, as this helps decide the most flattering lash style.
Then check the spacing between lashes to ensure a balanced, natural look.
Face shape should also be considered, since it affects the best lash length and curl choice.
Lastly, always assess lash strength and health—strong lashes allow more styling options, while weaker lashes need a softer, more careful approach.
Step-by-Step Guide to Creating a Lash Map
Creating a lash map starts with a quick consultation to understand the client’s desired look, followed by analyzing their eye shape to choose the right lengths and curls.
Then, a simple sketch is made—usually with shorter inner corners and longer outer edges—while curls are selected to suit the eyes.
Using a ruler ensures proper spacing and accuracy. Throughout the process, clear communication with the client helps make any needed adjustments for a perfect, customized result.
Popular Lash Mapping Styles You Should Know
Popular lash mapping styles include the Natural Lash Map, which gives a soft and everyday look with subtle lengths and curls.
The Cat-Eye style adds drama by extending lashes at the outer corners for a lifted effect, while the Doll Eye or Open Eye style uses longer lashes in the center to make eyes look bigger and brighter.
The Winged style flares outward for a soft, elegant shape, and Glam styles use longer, bold lashes for a full, dramatic volume.
Each style creates a different effect to suit different looks and occasions.
Natural Lash Map (Soft, Everyday Look)
The Natural Lash Map gives a soft, everyday look that enhances the eyes without appearing heavy or dramatic.
It uses shorter lashes at the inner corners and gradually longer ones toward the outer edges to create a gentle lift.
Light curls help keep the finish natural and seamless, blending well with real lashes. This style is perfect for daily wear or simple, elegant occasions, offering a clean and effortless beauty.
Cat-Eye Lash Map (Elongated & Sultry Look)
The Cat-Eye Lash Map creates a long, lifted, and sultry look by focusing longer lashes on the outer corners and shorter ones on the inner corners.
This technique elongates the eyes for a bold, feline effect. It’s ideal for special occasions or nights out, adding drama while still looking elegant.
When adjusted to the client’s eye shape, it ensures a flattering and comfortable fit, leaving a confident, glamorous finish.
Doll Eye / Open Eye Lash Map (Bright & Lifted Look)
The Doll Eye or Open Eye Lash Map creates a bright, youthful, and wide-eyed look by placing longer lashes in the center and shorter ones at the corners.
This lifts the eyes and adds soft fullness for a natural doll-like effect. It’s ideal for a gentle yet eye-catching style and can be enhanced with extra volume for a more dreamy finish.
When adjusted to the client’s eye shape and balanced with the right curl and length, it delivers both beauty and comfort.
Winged Lash Map (Flared & Lightweight Effect)
The Winged Lash Map creates a flared, lifted look by placing longer lashes on the outer corners and shorter ones toward the inner eye.
It gives a chic, eye-opening effect that suits especially almond and round eyes, adding subtle drama without feeling heavy.
The lightweight design ensures comfort, while mixing curl types can add extra depth and dimension for a more polished finish.
Glamorous Lash Map Styles for Full Volume Looks
Glam lash maps create bold, full-volume looks with extra drama and impact. The Russian Volume technique uses multiple lightweight lashes for a soft, fluffy finish, while hybrid styles mix classic and volume for added texture and depth.
Colored or glitter lashes can also be added for a more eye-catching effect.
When customized to the client’s eye shape and preferences, these styles deliver a striking, flawless glam look.
Who Is Burt Thicke? Full Biography, Career & Untold Facts
Uncuymaza Explained: What It Is, How It Works & Why It Matters
Cumhuritey Demystified: What It Means, How It’s Used & Why It Matters
What Is Beit Bart? Complete Guide with Real Meaning & Usage
What Is Nova Scola? Complete Overview and Hidden Facts
Advanced Lash Mapping Techniques & Customization for Clients
Advanced lash mapping allows fully customized lash designs based on each client’s eye shape and natural lashes.
Artists choose the right lengths, curls, and thickness to enhance features, while layering adds a natural 3D effect with shorter inner corners and longer outer edges.
Color or ombre lashes can be added for a stylish touch. Clear communication with the client ensures the final look matches their desired style perfectly.
Lash Mapping for Beginners: Simple Starting Guide
Lash mapping for beginners is simple once you understand the basics. Learn different eye shapes first, as they guide the best lash style for each client.
Use basic tools like a ruler or calipers, tape, and a notebook for notes. During consultation, assess the eye shape and corners to plan lengths and styles.
Start practicing easy maps like natural, cat-eye, and doll-eye, and improve through practice and small adjustments during application.
Common Mistakes to Avoid in Lash Mapping
Common lash mapping mistakes include ignoring the client’s unique eye shape and using a one-style-fits-all approach.
Poor measurements can lead to uneven results, while weak communication may cause mismatched expectations.
It’s also important to protect lash health by avoiding heavy extensions on fine lashes.
Finally, don’t follow trends blindly—always choose what best suits the client for natural, balanced results.
Who Is Shani Levni? Full Biography, Life Story & Unknown Facts
Doujen Moe Meaning: Origins, Culture, and Modern Usage
Christa Podsedly: Biography, Age, Family, and Untold Facts
Lesbufy Explained: Features, Benefits & How It Works
Seek to Find Thrift Store: How to Find the Best Deals Near You
Trends in Lash Mapping
Lash mapping trends now focus on personalization, with custom designs made for each client’s eye shape.
Volume styles are popular for creating fuller yet natural looks, while sustainable beauty practices using cruelty-free products are also growing.
Colored lashes are another trend, adding a fun, unique touch.
Keeping up with these trends helps lash artists stay modern and meet client needs effectively.
Tips to Improve Speed and Efficiency in Lash Mapping
To improve speed in lash mapping, keep your workspace organized with all tools ready before starting.
Practice regularly to quickly recognize suitable lash maps for different eye shapes, and use templates if needed.
Manage your time by dividing the session into clear steps like consultation, mapping, and application.
Communicate early with clients to understand their desired look, and take notes after each appointment to learn and improve.
FAQS About Lash Map
What does a lash map mean?
A lash map is a simple guide used by lash artists to plan where each eyelash extension will be placed. It shows the lengths, curls, and styles for different parts of the eye. This helps create a balanced and beautiful look that suits the client’s eye shape.
Which lash map suits me?
The best lash map depends on your eye shape and the look you want. For example, natural maps suit everyday looks, cat-eye maps give a lifted and dramatic effect, and doll-eye maps make eyes look bigger and brighter. A lash artist chooses the best style after checking your eyes and preferences.
How to lash map for beginners?
Beginners should start by learning eye shapes and simple styles like natural, cat-eye, and doll-eye. Use a ruler or guide to plan lash lengths, starting short at the inner corner and longer toward the outer corner. Practice sketching maps and always adjust based on eye shape for better results.
What is a good lash map for small eyes?
For small eyes, a doll-eye or open-eye lash map works best. It uses longer lashes in the center to make the eyes look bigger and brighter. Avoid very heavy or long outer corners, as they can make small eyes look smaller.
What are some good lash maps?
Some popular lash maps include natural (soft and simple), cat-eye (lifted and dramatic), doll-eye (bright and open look), winged (flared and elegant), and glam (full and bold). Each style creates a different effect, so the best choice depends on the client’s eye shape and desired look.